How to Implement End-to-End DevOps on a Go Lang Demo News Application
DevOps Engineer with a strong background in Configuration Management and support roles, skilled in tools like Azure/AWS, Gitlab CI, ArgoCD, Docker, Kubernetes, Helm, Terraform, and Ansible. I focus on automating processes, improving system performance, and making networks scalable and secure in cloud environments.
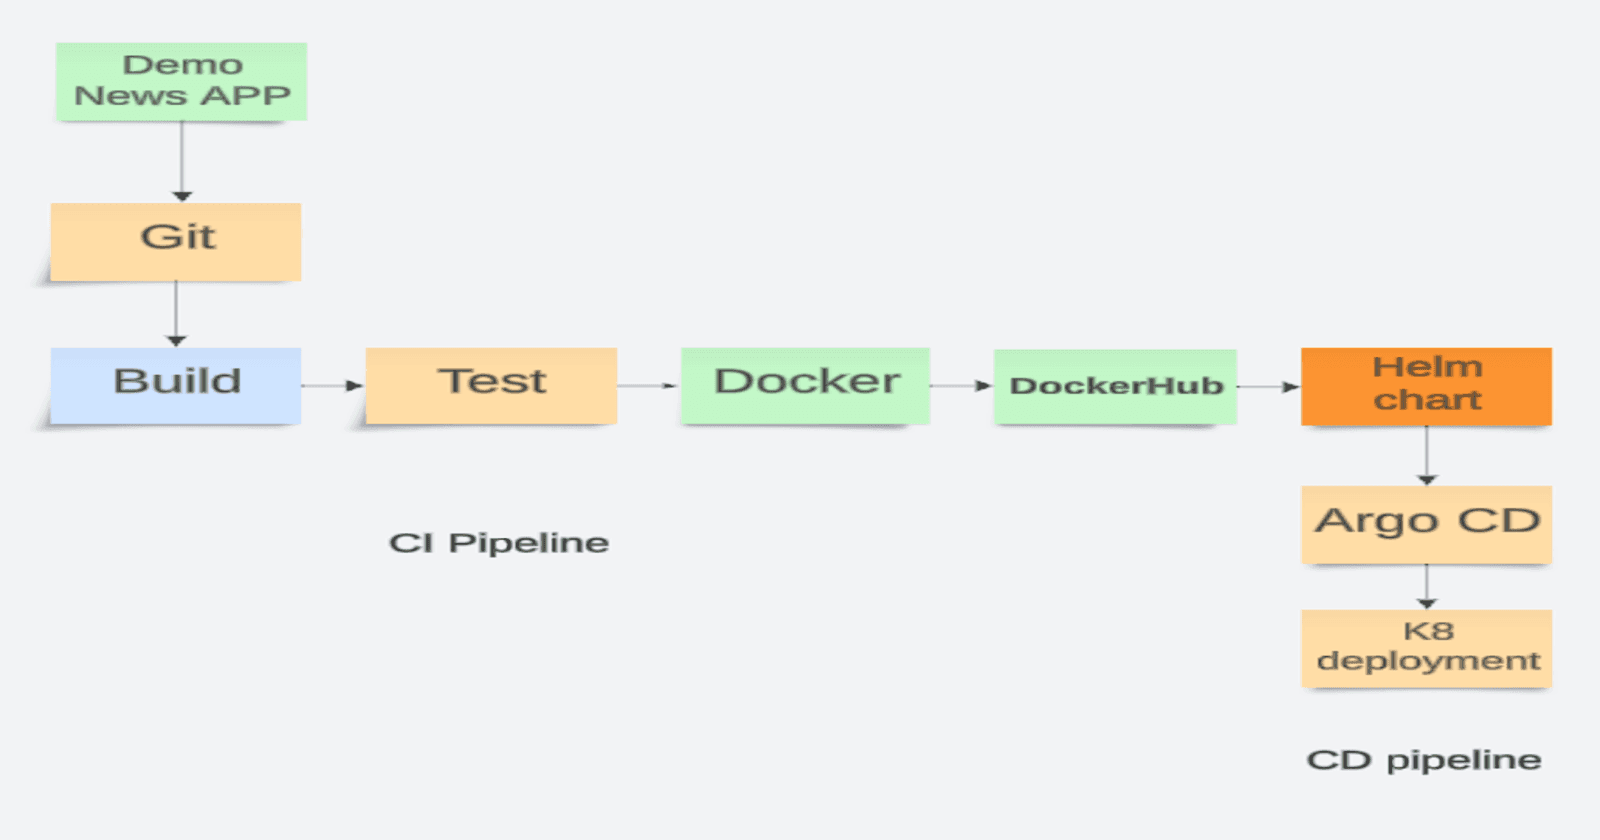
In the fast-paced world of software development, adopting DevOps practices is essential for efficient workflows, automated pipelines, and quick delivery. If your project isn't "DevOpsified" yet, you might be missing out on the benefits of continuous integration, containerization, and a smoother deployment process. Today, we're walking through a hands-on approach to transforming a basic Go lang demo news application ("Demo News App") into a fully DevOps-enabled project. l will guide you through the complete process, including setting up CI/CD, containerizing the application, creating Kubernetes manifests, and more. Let’s dive right in
Step 1 : Containerization
The first step is to containerize the application using Docker. We will write a multi-stage Dockerfile to ensure that our images are both secure and lightweight. The Dockerfile will include:
A base image for building the application.
A distroless image for running the application.
This approach not only reduces the image size but also enhances security by minimizing the attack surface.
First you need to understand the application. Here we're dealing with a Go-based portfolio web app. So, we will first run the application locally to understand how it works, what ports it uses, and how it’s built.
First, clone the repository from GitHub using:
git clone https://github.com/sgawali/news-demo-app.git
Now refer to readme file and follow all prerequisites & get started steps to run demo app locally

As shown in screenshot News Demo App will be launched in your browser. We can type any topic to search news related to that topic in search window and then hit enter to view all news related to that topic.
Writing the Multi-Stage DockerFile:
Using a multi-stage Dockerfile saves space and adds security layers to the Docker image. We first use Go lang base image to build the app and then copy it into a minimal distribution image, ensuring we reduce the size and potential vulnerabilities.
Here's a snapshot of what the Dockerfile looks like:
FROM golang:1.23 AS base

WORKDIR /app
# We want to populate the module cache based on the go.{mod,sum} files.
COPY go.mod .
COPY go.sum .

RUN go mod download

COPY . .

# Build the Go app
RUN go build -o ./out/news-demo-app .

# Start fresh from a smaller distroless image
FROM gcr.io/distroless/base

COPY --from=base /app/out/news-demo-app /app/news-demo-app

COPY --from=base /app/assets ./assets

COPY --from=base /app/news ./news

COPY --from=base /app/index.html .

# This container exposes port 3000 to the outside world
EXPOSE 3000

# Run the binary program produced by `go install`
CMD ["/app/news-demo-app"]
This Dockerfile is an industry-standard approach. It builds the app, then packages it into a lightweight, distroless container which is more secure and faster to deploy.
Once your Dockerfile is ready, you can build and run your image:
docker build -t news-demo-app:v1 .
docker run -p 3000:3000 go-web-app:v1
Visit localhost:3000 and you'll see your app running in the container!
Step 2 : Creating Kubernetes Manifests
Next we will create kubernetes manifests, including deployment, service and ingress configurations. This will allow us to deploy our application on a kubernetes cluster effectively. The deployment manifests will specify the number of replicas, container image and ports.
Deployment YAML
  apiVersion: apps/v1
kind: Deployment
metadata:
  name: news-demo-app
  labels:
    app: news-demo-app
spec:
  replicas: 2
  selector:
    matchLabels:
      app: news-demo-app
  template:
    metadata:
      labels:
        app: news-demo-app
    spec:
      containers:
      - name: news-demo-app
        image: samgawali/news-demo-app:v3
        ports:
        - containerPort: 3000
Service YAML
A Service allows your app to be discoverable
apiVersion: v1
kind: Service
metadata:
  name: news-demo-app
spec:
  selector:
    app: news-demo-app
  type: ClusterIP
  ports:
  - port: 80
    targetPort: 3000
    protocol: TCP
Ingress YAML
while an Ingress helps map external traffic into your cluster’s services.
apiVersion: networking.k8s.io/v1
kind: Ingress
metadata:
  name: news-demo-app
  annotations:
    nginx.ingress.kubernetes.io/rewrite-target: /

spec:
  ingressClassName: nginx
  rules:
  - host: "*.samgawali.com"
    http:
      paths:
      - pathType: Prefix
        path: "/"
        backend:
          service:
            name: news-demo-app
            port:
              number: 80
At this stage, your app is ready for deployment into a Kubernetes cluster.
Step 3 : Creating a Kubernetes Cluster
For production-grade deployments, we'll set up an Civo Kubernetes Cluster
Install the necessary CLI tools including kubectl, Civo CLI
Authenticate your Civo account using api key
civo apikey add key-name “Your Civo API Key“
Create the cluster
civo kubernetes create demoapp-cluster --size "g4s.kube.medium" --nodes 2 --wait --save --merge --switch --region FRA1 -r=Traefik -a=Nginx --create-firewall --firewall-rules "80,443:0.0.0.0/0"
Once done, use kubectl to deploy the Kubernetes manifests you created earlier. A simple kubectl apply command will do the trick:
kubectl apply -f deployment.yaml
kubectl apply -f service.yaml
kubectl apply -f ingress.yaml
Be sure to expose the service using a NodePort or Load Balancer for external access!
Ingress Controller Installation & Configuration
kubectl apply -f https://raw.githubusercontent.com/kubernetes/ingress-nginx/controller-v1.8.2/deploy/static/provider/cloud/deploy.yaml
This will install nginx ingress controller in ingress-nginx namespace
A Loadbalancer will be created in Civo Kubernetes Cluster as shown in below screenshot

DNS Mapping
We will map our domain to the application using DNS. This will allow users to access the application via a friendly url instead of an ip address. I am using Civo DNS in Civo dashboard to configure my website as DSN for our application.

Step 4 : Setting Up Helm Chart
Helm simplifies managing your Kubernetes configs by allowing you to easily deploy to different environments (e.g., Dev, QA, Prod). If you need to deploy the same app across multiple environments with minimal changes, Helm is your go-to tool.
To get started, create a Helm chart:
helm create news-demo-app-chart
Now delete all sample files in templates folder and copy all our app Kubernetes manifests files into it for details you can refer to my git repository.
Then, define the values for each environment in values.yaml file
Test if generated helm chart is perfect or not with below commands
helm lint ./news-demo-app-chart

helm template ./news-demo-app-chart

helm install news-demo-app ./news-demo-app-chart --dry-run
Deploy the Helm chart with a command :
helm install go-web-app ./go-web-app-chart
Step 5 : Implementing Continuous Integration (CI) with GitHub Actions
GitHub Actions is a powerful tool to automate your development workflows. Here's how you set up CI for the app:
Create a GitHub Actions Workflow
Under .github/workflows/ci.yml, implement several stages:
Build and Test: Automatically build the Go app whenever code is pushed.
Test: Test Go app
Docker Image Build & Push: After tests pass, push the Docker image to Docker Hub.
Update Helm: Push the updated Helm values file with the latest Docker image.
Here’s a snippet from the workflow:
# CICD using GitHub actions

name: CI/CD

# Exclude the workflow to run on changes to the helm chart
on:
  push:
    branches:
      - main
    paths-ignore:
      - 'helm/**'
      - 'k8s/**'
      - 'README.md'

jobs:

  build:
    runs-on: ubuntu-latest

    steps:
    - name: Checkout repository
      uses: actions/checkout@v4

    - name: Set up Go 1.23
      uses: actions/setup-go@v2
      with:
        go-version: 1.23

    - name: Build
      run: go build


  code-quality:
    runs-on: ubuntu-latest

    steps:
    - name: Checkout repository
      uses: actions/checkout@v4

    - name: Test
      run: go test


  push:
    runs-on: ubuntu-latest

    needs: build

    steps:
    - name: Checkout repository
      uses: actions/checkout@v4

    - name: Set up Docker Buildx
      uses: docker/setup-buildx-action@v1

    - name: Login to DockerHub
      uses: docker/login-action@v3
      with:
        username: ${{ secrets.DOCKERHUB_USERNAME }}
        password: ${{ secrets.DOCKERHUB_TOKEN }}

    - name: Build and Push action
      uses: docker/build-push-action@v6
      with:
        context: .
        file: ./Dockerfile
        push: true
        tags: ${{ secrets.DOCKERHUB_USERNAME }}/news-demo-app:${{github.run_id}}

  update-newtag-in-helm-chart:
    runs-on: ubuntu-latest

    needs: push

    steps:
    - name: Checkout repository
      uses: actions/checkout@v4
      with:
        token: ${{ secrets.TOKEN }}

    - name: Update tag in Helm chart
      run: |
        sed -i 's/tag: .*/tag: "${{github.run_id}}"/' helm/news-demo-app-chart/values.yaml

    - name: Commit and push changes
      run: |
        git config --global user.email "sameer@sgawali.com"
        git config --global user.name "sgawali"
        git add helm/news-demo-app-chart/values.yaml
        git commit -m "Update tag in Helm chart"
        git push
Now, pushing to the repo triggers automated testing, Docker pushing, and Helm updates.
Step : 6 Continuous Delivery (CD) with Argo CD
Argo CD provides a seamless way to implement GitOps, allowing automatic updates to your Kubernetes cluster every time there’s a new version.
Install Argo CD
Run the following to install Argo CD in your Kubernetes cluster:
kubectl apply -n argocd -f https://raw.githubusercontent.com/argoproj/argo-cd/stable/manifests/install.yaml
Set Up Argo CD
Install a Helm chart directly through Argo CD by creating a new app in the Argo CD dashboard:
Set the project to "default."
Connect to the GitHub repository.
Specify the path to your Helm chart and set the sync policy to Automatic.
Now, Argo CD will monitor the Helm chart for new changes and deploy updated versions without any manual intervention!


As shown in Screenshots our News demo application is now accessible on my websites for which i have created DNS records. A change in app’s source code will automatically trigger Ci/CD pipelines and changes will be deployed automatically by Argo CD tool.
Conclusion
When you take a non-DevOps project and transform it into a fully automated, scalable, and reliable system, the possibilities are endless. We started with a basic Go lang demo news app and implemented a full DevOps cycle: containerizing the app, deploying it in Kubernetes with Helm, and automating continuous integration and deployment using GitHub Actions and Argo CD.
Now, it’s time for you to give it a shot! Check out the project repositories, follow the steps, and "DevOpsify" your next project.